
Hello all, me again. I’ve had a couple of “distractions” over the last week therefore I haven’t quite finished my denim skirt, but I thought I would show you what I have accomplished so far – and perhaps this week you might even get a laugh out of it!
I started my denim skirt by cutting out a Sewaholic Hollyburn skirt pattern here and making my back pockets, and doing my topstitching and flat felled seams here.
Now it is time to sew my jeans fly front. My one side is interfaced, double fold bias tape is sewn on the rough edge and the piece is sewn on to my left side front (if I am looking at the skirt). The interfacing will never show as this piece is folded over to the inside.

On my right side front (if I am looking at my skirt), I sewed on my zipper and my other piece in one step. This piece is also interfaced but it was a larger piece that was folded in half, so both sides have a right side showing.

TA DA!
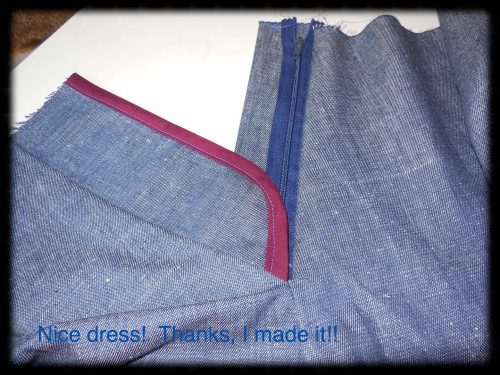
Now I fold over my left side piece.

Basting the left side of my zipper to my left side front. Here is where I almost always forget to pin my right side piece out of the way. Only the left side of my zipper is pinned and basted to my left side front OR I will never be able to get into my skirt, the opening will be sewn shut. Now wouldn’t that be funny.

Topstitching done, but again only through the left side front and the left side of my zipper. Don’t sew yourself out. When my topstitching comes close to the bottom of the zipper, I stop, tie my ends off and then continue on with my topstitching making sure I go through all the layers from then on. I am seriously not sure if I like this topstitching design but there is always the opportunity to pick it out or add to the design later. We shall see.

Now for my front pockets. I sewed the front pocket on, right sides together, with a strip of interfacing for stiffness and to help prevent stretching.

I folded over the front pocket piece and pressed. You will be happy to know that I remembered to use my clapper this time after pressing. It really does make a difference.

I pinned the inner pocket out of the way when I did the topstitching on the pocket opening. I wouldn’t want to sew my pocket shut. I used my blind hem foot and my 1/4 inch seam foot to guide me.

Here is where the inner pocket is folded over (I love one piece pockets) and sewn along the bottom, side, and top to make my pocket.

Now for the side seams. I have chosen to do faux flat felled seams this time. Same ‘cept you don’t have to fold the one seam allowance over the other. Just sew your seam, press it to one side and topstitch through all the layers. I, as usual, being my tricky self pressed it to one side, pinned it, and flipped it over to sew my topstitching on the right side of the fabric.

Finished!

Oh! Yes, yes, now you can laugh. Well, isn’t that nice. (using my best Roz from Monsters, Inc. voice) It seems that I have sewn my inner pocket into my faux flat felled seam with my topstitching because I didn’t pin it out of the way.

So after a brief session with my seam ripper and some chocolate, it was time to make my belt loops. I could never understand how someone could sew all those little tiny short belt loops without going crazy. Then I learned they aren’t like that to start with. You start with a couple of long strips of your denim. I folded and pressed them first.

Then I topstitched them. I always like leaving long threads so that it is easier to guide my smaller pieces through my sewing machine.

Next my belt loops were trimmed to the proper length (these were 3 inches) and they were pinned on with my waistband and sewn on in one pass. I added, by the way, an extra inch to my Hollyburn back pieces so that I could gather the back a bit. The front is still the proper Hollyburn pattern pieces. We shall see whether this works or not.

Topstitching done. I’ve got some ends to tie off.

Next my rivets, jeans button and buttonhole and hemming and I get to use my husband’s hammer! I should have my other “distractions” ready to show you next week too.
So confess – we all know you have done it – when was the last time you sewed madly and passionately only to have to reach for your ripper to fix your mistake? Don’t be shy now!
Happy Sewing!

Such clear photos! This looks as if it’s going perfectly (ignoring pesky wandering pocket hiccup of course).
Thank you. I almost said “so far, so good” but we all know that’s not quite true! 😃
This is a great post Linda – I’ve really got to try the fly zip before long and your pictures have definitely helped me visualise what needs to happen! Thank you. I will try to avoid sewing my pocket into my seam though!
Thank you! I’m always glad if I can show some one something different – even if it’s “pin your pocket down”!
Wow, this has been an epic journey. I can’t wait to see your finished skirt, it will be amazing.
Thank you! It has been “slow sewing” this past couple of weeks, but I am enjoying myself!
You are doing such an amazing job on this. I look forward to the reveal. The seam ripper is my friend! 🙂
Thank you. Yes, sometimes sewing is one step forward and two back! 😃
Linda I just love your sense of humor! We’ve all done that with pockets – and half a dozen other things. That’s why God invented the seam ripper. Or as glider pilots say about gear-up landings: ‘there are those who have and those who will!’ But seriously, you’re doing a great job on this skirt! I can’t wait to see it finished!
Ah well, what else can I say, but Thank you! We shall see how the rest of this project goes! 😃
Great work on the skirt Linda. I’d have everything sewn shut and I wouldn’t be able to get into the skirt!
Thanks! Then you would just have to visit me, or me you, and we could muddle through it together! 😂
Coming along so well, even taking hiccups into account. My seam ripper and I are inseparable 😉
Do they market a way to have it attached to your sewing machine? I’d buy one!
Sadly not. I have multiples so I can always find one.
Well if you were honest enough to show your “pocket booboo” I will confess my deep dark secret. Having had children I no longer have that rock hard tummy I once had (now there’s a laugh in itself). I accidentally did the same thing with side pockets, in pants, and found it became a God send. I had a tendency to put my hands in my pockets causing them to bulge. When I tried the pants on, with sewn up pockets, I could not put my hands in my pockets PLUS they no longer bulged but instead became a tummy flattener. Who needs pockets anyways?
I love your top stitching and of course, as usual, your skirt is beautiful.
Well I love your boo boo! I have seen pants with tummy tamers but have not thought to do them myself. I should work on that! My pants would look so much better! Thanks for the compliment and visiting my blog!
Great post Linda. I’m saving the fly shield finish for the next time I make one. I’ve not seen a folded pocket piece like that, saving that idea too.
I did almost the same thing in my latest chapter of the seam ripper saga; I caught the bodice of my nighty as I topstitched an elastic casing closed.
And nighty fabric might be a bit touchy when using a seam ripper! Thanks for the compliments and stopping by!
Is a sewist having a pocket boo boo the equivalent of a painter painting himself into a corner? You know what not to do but you’re so engrossed in what you’re doing that you do it anyway. I did the same thing making a poster once. It was beautiful, except that I spelled “Tuesday” like this “Tueday” 100 posters into the trash.
Exactly! Perfect analogy! “Ouch” re the posters! 😖
This skirt is coming along very nicely indeed! I may have had a small chuckle when I saw your pocket but only because I’ve done the same thing myself! Looking forward to seeing the skirt once the hardware has been added!
Thank you! I had a big laugh when I discovered my mistake! 😃
Wow, so neat! Even the mistake looks neat!
Aha, thank you! Using the 1/4 inch and edge foot really helps!
I love the top stitching and like using it too, but it does make everything seem to take longer??
It’s so easy and so annoying when a piece of fabric gets stuck underneath and we all do it.
My sewing nightmare thing is when you’re doing an edge stitch on a fabric thats a bit slithery and your sewing along perfectly then next thing – your off – pushed off the fabric and sewing the air – hate it!!!!
I agree, when topstitching it is just doing the same seam over and over again! Those slippery fabrics are the worst! I used a couple of rolls of Wonder tape once just to stick my fabrics together before I sewed them – I was so annoyed, it was either that or Super Glue!
I love how you finished the fly piece with bias tape, great idea. I also love your topstitching.
Thank you!