
I used to buy more bags than clothes. Every time I walked past a bag shop I would stop in. After “just stopping in” a few days in a row, I’d finally buy what I had been looking at. Now that I think about it, I pretty much always bought bags with the same “insides” but with a different style outside.
I haven’t bought a handbag for myself, I think, since I started my RTW fast in January 2015. I not only broke the clothes shopping habit, I also broke the bag buying habit!
I have been scouting around for a me-made replacement. I bought this pattern from Sallie Tomato. Although I haven’t tried the pattern yet, I love the look of it! It looks almost exactly like what I usually bought. One zippered pocket each for my bus pass, my keys, my wallet and phone, and one big enough for my iPad. Oops! It’s missing the space for my iPad.

No problem! I’ll just figure out a way to add another pouch on the backside of this Sallie Tomato bag … um … hopefully!

To be on the safe side I cut out 12″ squares of my exterior fabrics and my lining, 8 squares total. Then there were the 4 squares of fusible Shape Flex for the lining pieces and the 4 squares of fusible Thermolan for the exterior pieces. I used fabric remnants, so I didn’t decrease my fabric stash any. 🙁 Good thing though – if it doesn’t work out it’s no loss! 🙂


The Thermolan didn’t fuse again – do I need a new iron? do I need to be more patient and press it more? – so I basted it on to all my exterior pieces.

I cut every one of my exterior pieces into the planned uniform strips.

This is the exterior backside of my bag…

with topstitching.

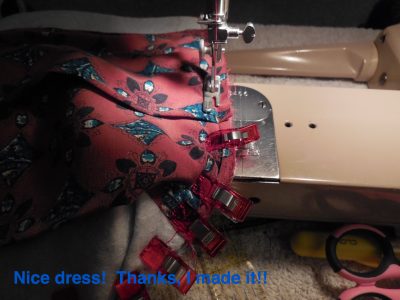
Next day I came back to prepare my zippers to find my tension messed up. I could clearly see that one, or both, of the cats had been playing with the upper threading of my machine. An easy fix … after rethreading my machine and ripping this out!

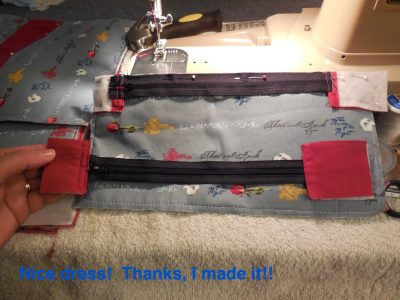
It was easy to sew these zippers in and add the topstitching.


The pocket linings were sewn onto the seam allowances left by the zippers.

Now the exterior front of my bag is complete with zipper pockets. Thank you Sallie Tomato for the inspiration and explanation!

I just need to finish off a bit of topstitching and sew in the bottom corners of all the pieces and these pieces are finished.

Bottom corners sewn in on all pieces, exterior and lining.

Now for some fun with the interior zipper pocket. I chalked in where the opening was to be and sewed it to mark and reinforce it.

I pinned the pocket lining on the right side of the interior lining on the back piece where I wanted the zipper pocket to be.

Sewed it following my previous stitching line and cut the opening carefully.

I pushed the lining through the opening and pressed it flat.

Wonder tape helped me place the zipper under the opening in my lining piece.

Zipper and pocket lining sewed in … and a label!

Before I sew together my two bag pouches I better sew the middle pieces of both pouches together, and what better way than to sew a pocket shape?

Next, with a lot of patience and manipulation, the fronts and backs of all the exterior bag pieces are sewn together (which is a bit tricky considering that two of the pieces are already sewn together). The same is done with the lining pieces.
This is what I have so far …

Then I went to the dentist for two fillings and lost my sewing mojo. Time for a break! But hang tight – I’ll be back with the “Big Finish!” next post!
Happy Sewing!
STASHBUSTING WITH THIS PROJECT? None, sewn with remnants, so still 145 meters remaining! (I think, after this bag is completed, it will be time to make some dresses!)

It’s looking good so far!
Wonder tape is just …… wonderful. I can’t imagine how I did things before I tried it 😃.
I agree! It is always by my side!
Looking good so far! I bet it’s more satisfying to sew a heap of bags this buy them.
Yes, the buying was getting a little ridiculous since I usually bought the same style all the time, just a different colour or flap or zipper!
Wonderful explanation & photos. When making bags I have abandoned fusible interfacing in favor of… automotive headliner from the upholstery department. This is a lightweight foam fused to a synthetic knit – usually a lightly brushed fiber. It is completely stable, easy to sew or quilt, doesn’t shrink when washed, and allows the bags to stand up beautifully. Baste to fabric by machine or with temporary basting spray. When purchased on sale or with a coupon, price is less than any heavy good quality stiffener I have found. And I totally agree about basting tape – I have introduced MANY people to its use, and buy a dozen or more spools at a time through the mail.
Great tip, thanks! Sewing supplies are quite often expensive. If you can find the same sort of item elsewhere it is usually less expensive. I do love my Wonder tape and use it on all sorts of projects!
You have such patience, Linda! And what precise work. It’s looking really good so far! Your comment about having fillings done made me smile…that’s enough to stop me in my tracks too.
Thanks! I don’t know why, but all I wanted to do was sit and stare at the TV. Perhaps tonight will be a Sewing night! 😁👍
It’s looking good. Strangely, I’d never thought of cats altering machine tension (I guess you can tell I don’t have a cat and haven’t had since I started sewing). One of the others in class is a bag sewer and it’s inspiring watching her and a lot of us have tried things we might’nt otherwise have done.
One or both of the cats apparently pulled the thread out from the top and the spool. It was wrapped around the tension pretty tight! I think it’s great fun trying new things!
This is really looking great Linda! You are going to have a wonderful new bag, with exactly the pockets you want! The photos really help explain the process.
Thanks! I never know if anyone else needs all those explanatory photos, but it sure helps me if I ever do something similar again!
You are really going to have to teach those cats to sew if they are so interested in your machines. Great looking bags guess I know where to turn when I need a new bag….says the sister with all the lovely dresses 😊😊
😂 You are funny! You’ve got a point there though. Maybe they could help cutting out the fabric? They are all over it anyway! Thanks for the compliment!
Ok being an artist I was intrigued by your sketch and notes on the side. I do something similar. What you’ve done so far looks amazing. Are you going to have options of different sizes? I’m very very interested in seeing the finished product.
Thanks! I am thinking the next one I make, a few projects down the road, will be smaller. I want something small, but something big enough to hold my stuff – so there is going to be a bit of experimenting…. Besides then I can have a bunch of bags in different colours and sizes, just like the old days! 🙂
Wonderful explanation. Great looking bags … It’s looking good so far!
Thank you! I’m trying! 😁 it’s coming along well! 😁
I love the fact that your cats play with the tension on your machines! This is a timely post as Mark and I have been designing me a cross body bag that will do all the things that you describe. I’m making mine out of leather so am going to have to practice first to make sure I get it right. I’m now wondering whether I should invest in this pattern…?
Yes, my cats are snoopy and love thread! Well this pattern is a simple one compared to what you could do. But I haven’t seen many patterns like this one. Actually this is the only one I have seen so if anyone knows of any others, I would like to see them. I basically made two of this pattern and sewed them together to get my two pouches. Working with leather is going to be quite the experience!