
And keep your cats out of your stuff!

As you can probably guess, not having a proper sewing room, Simon and Sophie love getting into my stuff! (I use a small sewing cabinet on wheels, which I love. It lets me sew in any room or corner of the house!) Before today, I covered my sewing cabinet with a towel and my sewing machine with an old tee shirt – classy, huh?
I decided it was time to protect my sewing cabinet with a washable mat and protect whichever sewing machine I was using with a proper cover.
The sewing mat was quite easy. I measured the cabinet top. The bottom black layer of the mat was cut from a pre-quilted cotton remanent. The top layer was cut from a remanent of the fabric I used to make this swimsuit cover up. I just sewed the two layers together and added black bias tape around the edges. Easy to wash and handy for poking the odd pin into too!

Simon loves my new sewing mat!

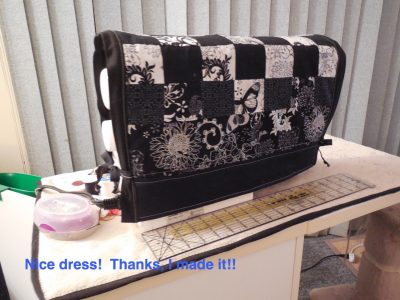
Next, a simple sewing machine cover. Now Janie, my Janome, doesn’t really need a cover to keep the cats out. She has a lid already protecting her thread and insides. But Janie is my biggest sewing machine so I measured her up and decided that I wanted to cover an area 16″ wide and 27″ long from the front to the back. If my sewing machine cover fit my biggest machine then it would fit my smallest!

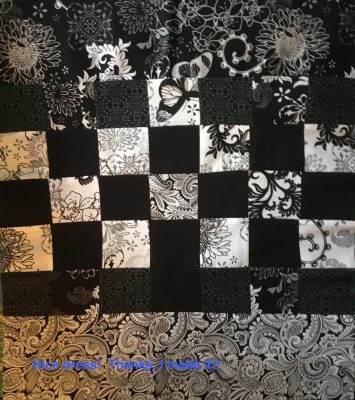
A few months ago when I was sorting and tidying up I found a small bag of 2″ squares of various black & white fabrics. I suppose I was aiming to make a quilted something or other someday? Luckily that project never happened … so this sewing machine cover could!
I had a lot of fun laying out the squares, deciding where each one could go, choosing the “best” design.

My 1/4″ foot ensured all seams were consistent.

Trying out combinations of squares …

All sewn together with a border on both ends.
Last border on both ends is a strip of black cotton. I used a fusible fleece on these strips to give my sewing machine cover more body.

And, of course, you can’t forget the topstitching!

I used more of the pre-quilted black cotton, pieced together, for the bottom layer. Before I sewed the top and the bottom layers of my sewing machine cover together, I sewed a “tie” at each of the 4 corners of my top layer, about 2″ up from the bottom edge.

I only had enough 1″ wide black bias tape for 1 1/2 sides of my sewing machine cover, so I made my own …


Bias tape sewn on to the sides of my sewing machine cover. Turned over the raw edge and topstitched down.


All done! I wonder how long it will take for Simon and Sophie to get their little paws on this?


What was the last non-wearable sewing project you made? Share it with us with a photo, link or comment!
Happy Sewing!
STASH BUSTING WITH THIS PROJECT? Nothing! I did a lot of “scrap” busting though! There is still 130.2 metres left in the fabric stash! Time to attack that again, I think!

I love quilted projects, they always look so creative and alive. The sewing machine cover looks good but was wondering how long it was going to take your assistants to find those ties and have some fun. Oh well, better the ties than miles of string in a fur ball. Project looks great.
😂😂 yup! There’s is always something for the assistants to get into! Simon jumped and yanked the shirt off my dress form last night. He brought the whole thing down on himself! 😂😂😂 Thanks for the kind words!
A little “catty” criticism of the project on the dress form maybe. Possibly he is trying to tell you that the color is just not right for you.
😂😂😂 he’s a little monster!
Oh this is fabulous. I’ve made several sewing machine covers, all from remnants I’ve found here and there, but none are as fancy as this. Love the quilting!
Thank you Sue! I love the idea of being able to use the remnants. I’m not sure what these 2 inch squares were meant for, I’ve forgotten by now, but like you, I like to use up every bit of fabric!
Your quilt-work, matching the different squares, looks great. It’s cute how the cats just want to be around you.
Thank you! And the cats want to be around me because they want my attention on them… ALL. THE. TIME! 😂😂😂
This is so cute! Great details! Thanks for sharing! I’m learning that for people who have pets it has become a necessity for them to take extra precautions to protect their sewing machine. Read Jennifer Moore’s blog post about her Public Service Announcement regarding this. Her blog is titled the Sewing Report. Best wishes!
Thanks! I’ll go take a look. It freaks me out when they get too close to my machine!