


Hello all, me again. I’ve had a couple of “distractions” over the last week therefore I haven’t quite finished my denim skirt, but I thought I would show you what I have accomplished so far – and perhaps this week you might even get a laugh out of it!
I started my denim skirt by cutting out a Sewaholic Hollyburn skirt pattern here and making my back pockets, and doing my topstitching and flat felled seams here.
Now it is time to sew my jeans fly front. My one side is interfaced, double fold bias tape is sewn on the rough edge and the piece is sewn on to my left side front (if I am looking at the skirt). The interfacing will never show as this piece is folded over to the inside.


On my right side front (if I am looking at my skirt), I sewed on my zipper and my other piece in one step. This piece is also interfaced but it was a larger piece that was folded in half, so both sides have a right side showing.

TA DA!
Now I fold over my left side piece.

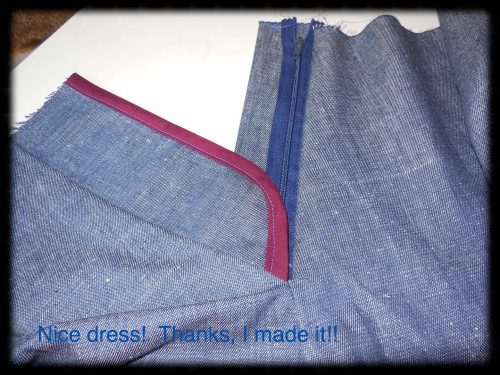
Basting the left side of my zipper to my left side front. Here is where I almost always forget to pin my right side piece out of the way. Only the left side of my zipper is pinned and basted to my left side front OR I will never be able to get into my skirt, the opening will be sewn shut. Now wouldn’t that be funny.

Topstitching done, but again only through the left side front and the left side of my zipper. Don’t sew yourself out. When my topstitching comes close to the bottom of the zipper, I stop, tie my ends off and then continue on with my topstitching making sure I go through all the layers from then on. I am seriously not sure if I like this topstitching design but there is always the opportunity to pick it out or add to the design later. We shall see.

Now for my front pockets. I sewed the front pocket on, right sides together, with a strip of interfacing for stiffness and to help prevent stretching.

I folded over the front pocket piece and pressed. You will be happy to know that I remembered to use my clapper this time after pressing. It really does make a difference.


I pinned the inner pocket out of the way when I did the topstitching on the pocket opening. I wouldn’t want to sew my pocket shut. I used my blind hem foot and my 1/4 inch seam foot to guide me.

Here is where the inner pocket is folded over (I love one piece pockets) and sewn along the bottom, side, and top to make my pocket.


Now for the side seams. I have chosen to do faux flat felled seams this time. Same ‘cept you don’t have to fold the one seam allowance over the other. Just sew your seam, press it to one side and topstitch through all the layers. I, as usual, being my tricky self pressed it to one side, pinned it, and flipped it over to sew my topstitching on the right side of the fabric.

Finished!

Oh! Yes, yes, now you can laugh. Well, isn’t that nice. (using my best Roz from Monsters, Inc. voice) It seems that I have sewn my inner pocket into my faux flat felled seam with my topstitching because I didn’t pin it out of the way.

So after a brief session with my seam ripper and some chocolate, it was time to make my belt loops. I could never understand how someone could sew all those little tiny short belt loops without going crazy. Then I learned they aren’t like that to start with. You start with a couple of long strips of your denim. I folded and pressed them first.

Then I topstitched them. I always like leaving long threads so that it is easier to guide my smaller pieces through my sewing machine.

Next my belt loops were trimmed to the proper length (these were 3 inches) and they were pinned on with my waistband and sewn on in one pass. I added, by the way, an extra inch to my Hollyburn back pieces so that I could gather the back a bit. The front is still the proper Hollyburn pattern pieces. We shall see whether this works or not.

Topstitching done. I’ve got some ends to tie off.

Next my rivets, jeans button and buttonhole and hemming and I get to use my husband’s hammer! I should have my other “distractions” ready to show you next week too.
So confess – we all know you have done it – when was the last time you sewed madly and passionately only to have to reach for your ripper to fix your mistake? Don’t be shy now!
Happy Sewing!